August 8th, 2014
There are some household jobs you should never do yourself – plumbing repairs, electrical wiring, asbestos removal, roofing and gas appliance installations spring to mind. Certain jobs done unprofessionally can be disastrous, not to mention downright dangerous! Thankfully, there are many household jobs you can do yourself and decorative concreting is one of them.
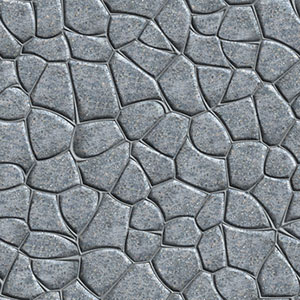
The possibilities that come with decorative concrete are almost endless. You can create intricate designs resembling anything from marble to brick, and can custom design your floor or driveway to perfectly compliment your home. To make the most of these possibilities, however, the right tools are essential. Do-it-yourself decorative concreting can be difficult and the right tool kit will make the task much easier.
Tools typically needed include:
 Scrubbing brush – Using a heavy duty cleaner and a scrubbing brush, you can remove any oil or dirt stains from aged concrete. Preparation of the concrete is extremely important to ensure good adhesion.
Pressure washer – A good pressure washer will ensure there are no loose surface contaminants that could cause the coating to delaminate. Look for a pressure washer with 3,000 psi.
Paint scraper – If your concrete had been previously painted, a paint scraper and suitable paint stripper will be required.
Heavy duty electric drill with mixing paddle – Unless you have arms like the Incredible Hulk, you will need a way to mix solutions such as Overcrete resurfacing compound, cement activator, water and colour powder tint.
Bucket sieve – Without a bucket sieve, you risk leaving little white dots all over your concrete. Failure to remove cement lumps from the decorative coating means that when walked on, all the little lumps will break up.
Squeegee – A squeegee is a great way to apply your first base coat and much easier than using a pointed trowel.
Pointed trowel – A pointed trowel will be required for the edges and tight corners the squeegee can’t reach.
Carbstone – This will help rub back any unwanted lines or lumps in your base coat once hardened.
Texture hopper gun – To apply spray-on concrete toppings, you will need a hopper gun. Ensure your hopper gun has a 90 degree elbow to keep it upright.
 Air compressor – An air compressor will supply air for the texture hopper gun but it’s important to ensure it is big enough. If you have to keep stopping and starting, you will be left with an uneven texture.
One litre measuring jug – This will be used for measuring cement activator and water.
Several plastic 20L pails – If you want to be extra organised, gather a few extra pails to separate jobs. One pail can be used to wash your mixer, one can be used for scooping water and another can be used to mix your product. If concreting a large area, use two pails for mixing, which will help you avoid a join line. Not overfilling will also prevent the mix from becoming dry at any point.
Masking plastic – This will help protect the walls and surrounding areas from being sprayed.
Paper masking tape – You’ll need this to hold up the masking plastic.
Filament tape – Filament tape is reinforced with fiberglass fibers and can be used to ensure clean edges. You can also use filament tape to apply patterns following your base coat.
Paint tray – This will hold your coat sealer for easy application.
Rolling frame – For a professional finish, a roller is an absolute must. Typically, a 230mm rolling frame is used for small areas, as they fit straight into the drum of the sealer.
Rolling sleeve – Choosing the right rolling sleeve is important, as the sleeve will impact the overall finish. For a smooth finish, look for a sleeve with a short nap (length of fibre) and for a rougher surface, look for a sleeve with a long nap. If you’re going to use a roller for stains and dyes, a high-quality, tapered-edge roller sleeve is best.
Stencil – If creating a pattern, a stencil is your best bet at creating a professional finish.
Clock – Sufficient drying times are the key to a good finish and should never be cut short.
Social: Doing some DIY decorative concreting? Check out our list of 20 tools you can’t do it without. #DIY #Concrete #Home


